blog

Will the firstline worker help democratise mixed reality?

It wasn’t until recently that I discovered the term “firstline worker” – if like me, you were in the dark, there are more than 2 billion firstline workers that are loosely defined as “the first employees of your company that customers interact with”.

Anyway, it turns out there are a bunch of firstline workers in industries such as manufacturing and healthcare and in these roles (think surgeon, or turbine assembler) they tend to use their hands a lot for their job.

In addition to being hands on, these firstline workers often need to refer to assistive material to in order to complete these hand on tasks – the surgeon might need to look at a scan or the assembler a schematic. Having spent many hours building Lego Technic as a kid, I appreciate how difficult it can be to remember where I was focused as my vision flipped between instructions and the project.

To help with all of this, there are several first party products from Microsoft under the Dynamics family designed specifically for firstline workers:

  • Dynamics 365 Remote Assist
  • Dynamics 365 Guides
  • Dynamics 365 Layout
  • Dynamics 365 Product Visualize

Take a look over here for more detail on what each of these solutions enable: https://dynamics.microsoft.com/en-us/mixed-reality/overview/

As I have watched these products come to market, the developer in me begins to wonder how others can build upon this momentum and while for HoloLens apps, Unity has a ton of documentation and a good community, for your average business apps developer (or really anyone that spends their time writing line of business code) it feels to me like a huge barrier to entry.

Because of this, I’ve decided to wipe the dust off a project from my Virtual World days, the Immersive Media Markup Language which I have been updating to support mixed reality devices such as HoloLens. My hope is that a simple language such as IMML can help empower this group of developers to more easily become mixed reality developers.

Expect more posts on this soon and let me know on Twitter (@craigomatic) if you want to contribute to the project!

Using ASP.NET Core to build an Outlook Add-in for Dynamics 365

Recently, I had a need to build an Outlook Add-in that connected to Dynamics 365 CE (previously known as CRM) so that the user could associate emails and calendar items with records in Dynamics 365.

While there is an OOB Dynamics 365 Add-in for Outlook, it did not deliver the experience we needed for our scenario, so there was no better excuse to roll up the sleeves and write some code. Here are some things I learned 🙂

Authentication

The simplest way to secure just about any resource for users of Office 365 is via Azure Active Directory and step one is to create an Azure AD app within the Azure portal.

But not so fast!

There are two different flavours of Azure AD, v1 and v2 and two different ways to handle authentication in an Office Add-in: SSO which inherits the logged in user from Outlook, or the Dialog API where the user is prompted for credentials.

It seemed obvious at first glance that I would use SSO – why would I hassle the user to enter credentials again when I can just use the token they already have?

Unfortunately there are 2 problems with this:

  1. SSO requires Azure AD v2, which does not currently allow scopes to 3rd party APIs that aren’t on Microsoft Graph, such as Dynamics 365
  2. The Identity APIs, which are responsible for SSO are only available on desktop Outlook for users in the Office Insider Preview fast ring, so if you have users that have not opted in to this program, authentication will fail

For my scenario, this left using the Dialog API and AAD v1 as the only option.

In Azure AD, make sure to give your app permissions to Dynamics 365:

Next, if you’ve done any ASP.NET development you’re probably familiar with the Authorize attribute. It looks like this:

[Authorize]

Simply place it at the top of any controller or action you want to protect, configure the middleware appropriately and the framework takes care of the rest.

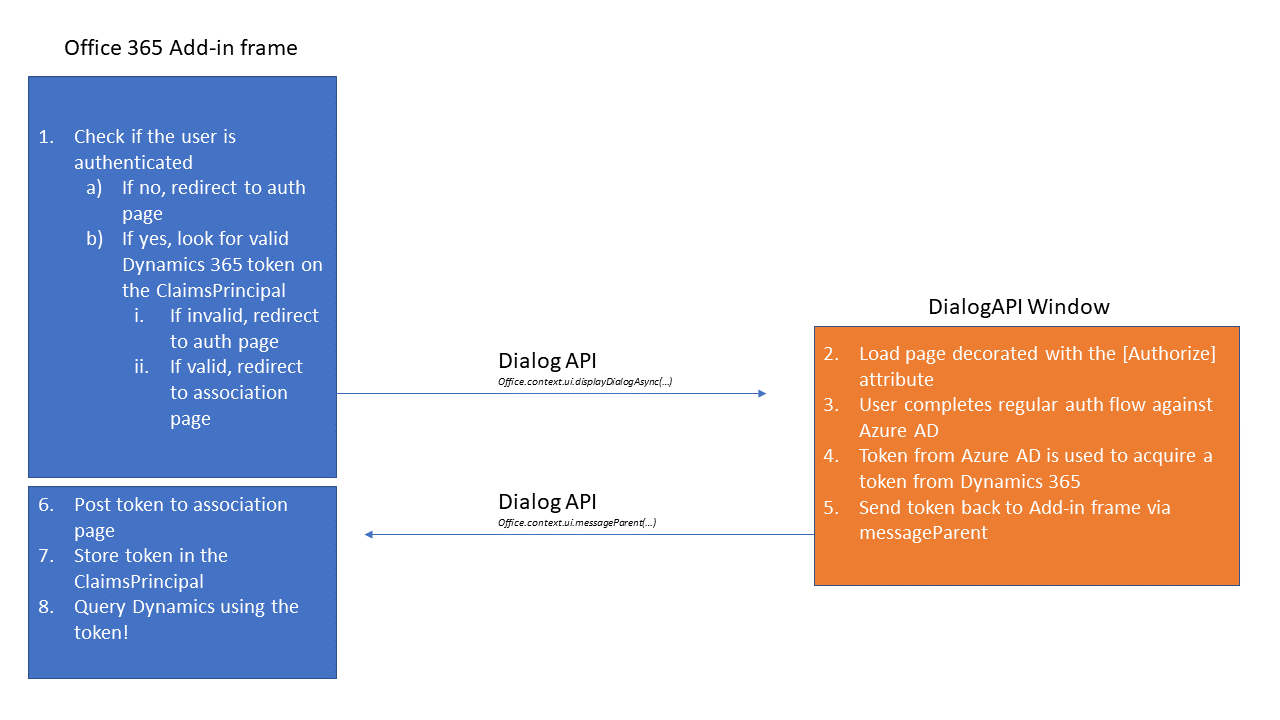
Alas! Azure AD will not allow a token to be acquired in a frame due to X-Frame-Options set to Deny, so the auth flow needs to occur in a new window.

This now causes a problem, as any updates to the UserPrincipal after successful authentication disappear when the window is closed and control returns to the parent frame – it’s a separate session.

To overcome this, I ended up posting back the token from the window via the Dialog API’s messageParent function, that I then use to acquire a token for my instance of Dynamics 365.

The end result is something that follows this sequence:

I also ended up writing some extensions that may be useful if you need to so something similar, find them at https://github.com/craigomatic/dynamics365-identity-extensions

DevOps

While an Office 365 Add-in is just a website and the usual deployment techniques work exactly as you’d expect, the add-ins are also required to include a manifest file that tells Office a bunch of things such as:

  • Where the add-in can be displayed (ie: Outlook, Word, Excel, etc)
  • The circumstances under which it should be displayed/activated.
  • The URI to the add-in

Something useful I found during development was to create several manifests, one for each of:

  • Dev on my local machine (localhost)
  • Test slot on Azure App Service for my beta testers
  • Production slot on Azure App Service for regular users

I would then sideload the dev, test and prod manifests, each with slightly different icons to my Office 365 tenant so that I could validate functionality as I worked.

Read up on the manifest format over at the Office Dev Center

Conversational UI Revisited

Last August I created a bot that used natural language to simplify some tasks in my wife’s business. At the time, I excited to make my bot respond to arbitrary commands and this worked really well when the bot was simple and had only one or two functions.

Over time I wanted the bot to do more and found not only did this increase complexity of the bot, it increased the complexity for the user!

How was I supposed to remember all those commands for the new features I wanted to add?

John Smith paid cash for classes
Enroll Jane Doe in Adult classes
Switch plan for Slim Jim to unlimited
etc…

At first, while I was caught up in the magic of natural language, I took what seemed the simplest path and dropped these commands into a text file. An innocent stopgap measure while I trained my brain to remember the commands that it had come up with in the first place.

Turned out this was difficult and if I’m honest, annoying!

Feeling a little downtrodden, I looked to others and discovered something interesting – Perhaps the future of bots is…buttons?

So with this in mind I rewrote my original bot to favour buttons and menu items over natural language and I found this allowed me to create something much more scalable and just as satisfying to use.

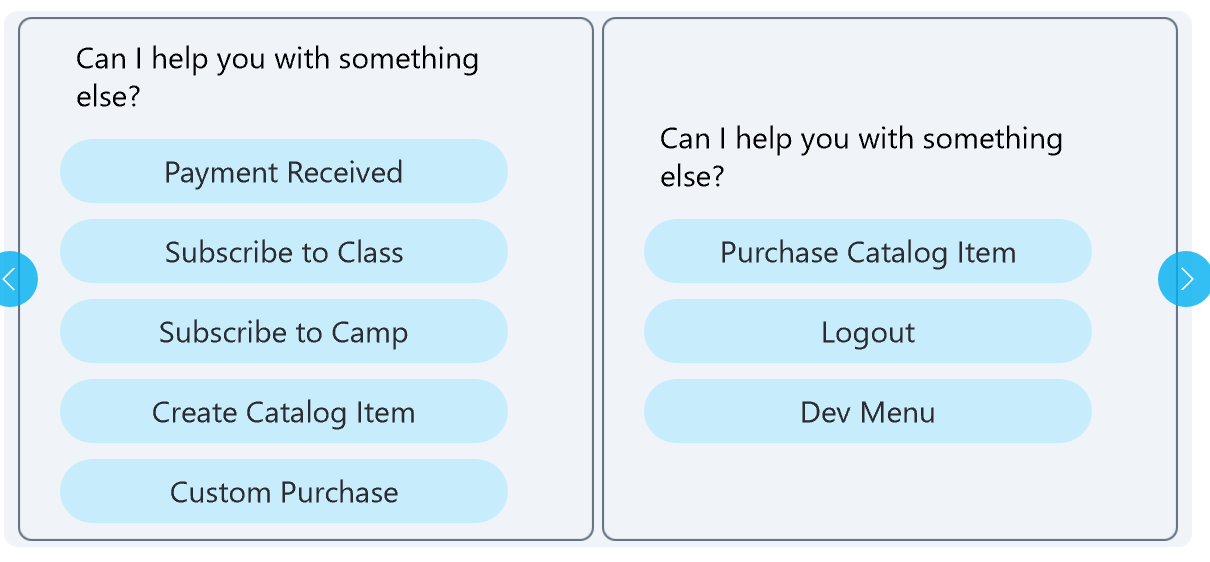
Here’s what the main menu looks like:

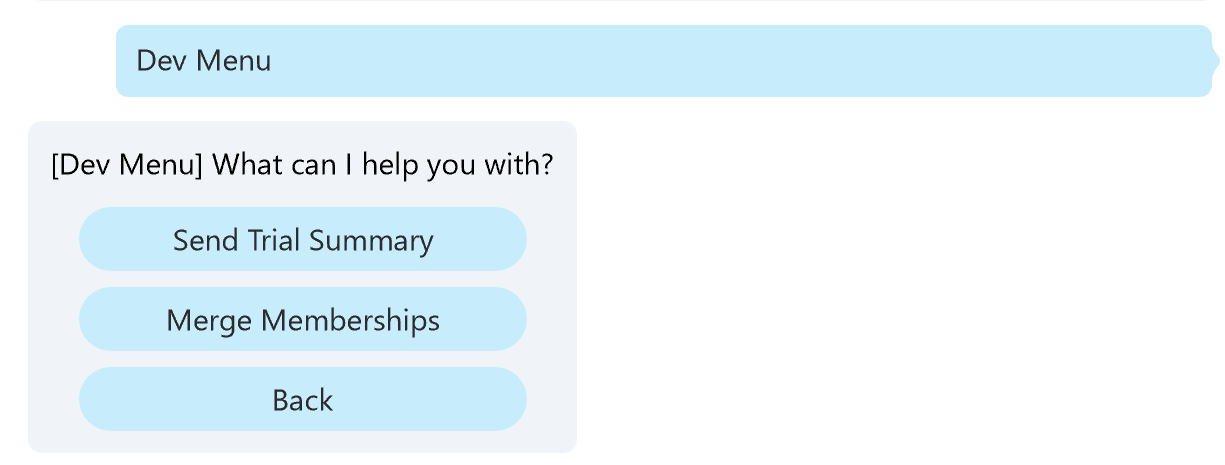
It supports nested navigation:

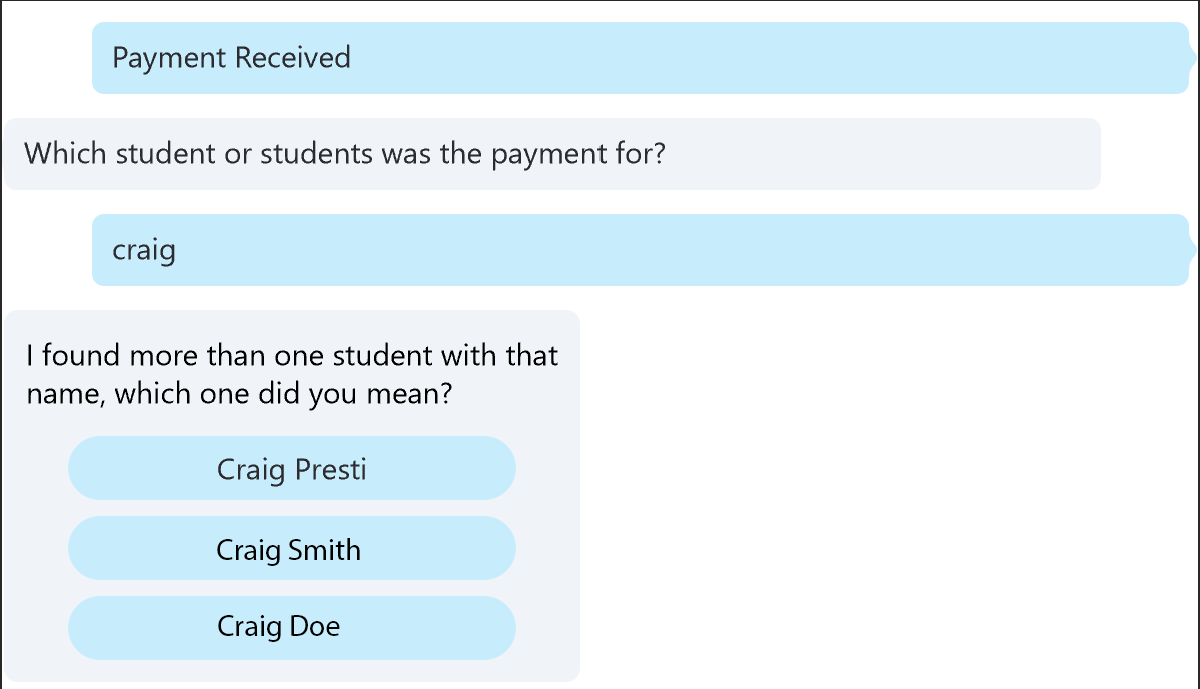
It also supports free text input that’s backed by Azure Search:

So while natural language is super cool and I still use it on a different bot I’ll write about soon, sometimes buttons are just simpler, faster and easier for users to work with.

Speaking of which, I’ve been working on a toolkit for C# that makes it a little easier to create menu driven bots, you can check it out over here: https://github.com/craigomatic/BotToolkit

Azure migration across international waters

Several years ago I setup an Azure subscription in Australia and became a BizSpark member. The BizSpark benefits are an excellent way to get something built on a shoestring budget and I’d highly recommend it to new startups. See here for more info on BizSpark.

I recently received a friendly email letting me know my BizSpark membership was expiring and options for continued service – the time had come to pay my own way. Given I now live in the USA and didn’t want to deal with currency conversion fees by associating a US credit card with the Australian subscription, I would need to move my data to a US subscription.

While it’s possible to transfer a subscription to a new owner at the click of a button, it’s not possible to transfer an Azure subscription to a new owner in a different country. It seemed I would have to manually migrate the data and services across.

Step 0: Plan resource groups

The original Azure subscription was a hot mess to say the least, following no logical naming pattern for resource groups or services. They also weren’t grouped appropriately.

This made it very difficult to work out which resource was application insights vs. the web app vs. the storage account vs. any number of other services the application was leveraging across Azure.

I wanted to do better with the new subscription and fortunately, the Patterns & Practices team have published a handy set of guidelines which I followed religiously and would highly recommend anyone reading this to consider following also.

Step 1: Move the data

My original Azure subscription had several storage accounts, using Blob, Table and Queue instances.

While I didn’t have a huge amount of data to transfer, I did want to avoid the additional step of downloading it locally (or to a VM) then uploading it to the new subscription where possible.

Fortunately, there’s a nice tool called AzCopy that does 90% of this!

The missing 10% is that you can’t copy an entire storage account across, so you need to copy each container. You’ll also be unable to copy tables directly from one account to the other, instead needing to export them to blobs/disk.

Blobs
Given AzCopy can’t copy an entire storage account, you’ll have to copy containers one-by-one. I wrote a little code to generate the AzCopycommands which saved a lot of time, here’s a snippet:

var sb = new StringBuilder();
var sourceUri = "https://<srcstoragename>.blob.core.windows.net/";//TODO: replace <srcstoragename> with the correct string
var destinationUri = "https://<deststoragename>.blob.core.windows.net/"; //TODO: replace <deststoragename> with the correct string
var sourceKey = ""; //TODO: source account key
var destinationKey = ""; //TODO: destination account key

//list all blob containers
var containers = _CloudBlobClient.ListContainers();

sb.AppendLine("=Containers=");
sb.AppendLine();

foreach (var container in containers)
{
    var azCopy = $"azcopy /XO /Source:{sourceUri}{container.Name} /SourceKey:{sourceKey} /Dest:{destinationUri}{container.Name} /DestKey:{destinationKey}";                

    sb.AppendLine(azCopy);
    sb.AppendLine();
}

System.IO.File.WriteAllText(@"C:\Users\<youraccount>\Documents\azcopy.txt", sb.ToString());//TODO: replace <youraccount> 

The above will result in a text file being generated with commands you can copy and paste into the console one-by-one.

They’ll look something like this:

azcopy /XO /Source:https://<srcstoragename>.blob.core.windows.net/www /SourceKey:<srckey> /Dest:https://<deststoragename>.blob.core.windows.net/www /DestKey:<destKey>

Note that the /XO flag will cause resources to not be copied if the last modified time of the source is the same or older than the destination.

Tables
Tables are a little more work to copy across. AzCopy doesn’t provide a way to copy directly to a new account like it does with blobs, so you’ll need to export somewhere (Blob, Azure VM, local PC, etc) then import from there to the new subscription.

This time we’ll have 2 commands for each table:

azcopy /Source:https://<srcstoragename>.table.core.windows.net/<tablename> /Manifest:<tablename>.manifest /SourceKey:<destKey> /Dest:C:\tables
azcopy /Source:C:\tables /Manifest:<tablename>.manifest /Dest:https://<deststoragename>.table.core.windows.net/<tablename> /DestKey:<destKey> /EntityOperation:"InsertOrReplace"

The first command exports from the source table to a local folder, the second takes the exported table and imports it into the new subscription.

Step 2: Migrate Cloud Service to App Service

Given I needed to shift things around, I took this as an opportunity to evaluate if continuing to use Cloud Services made sense given there have been few features/improvements for them lately.

After some light reading, I decided App Service was the path forward.

Fortunately, Cloud Service Web Roles map nicely to App Service . The major difference is the location of the app settings, App Service Web Apps just use web.config like usual instead of the .csdef files in the Cloud Service.

Migration turned out to be some simple renaming, from:

var someSetting = RoleEnvironment.GetConfigurationSettingValue("TheSetting");

To:

var someSetting = System.Configuration.ConfigurationManager.AppSettings["TheSetting"].ToString()

The Cloud Service Worker Role took a little more effort to migrate – in the end I decided to port it to a WebJob, although I think probably it could have been hosted as a Web App also.

Because my Worker Role manages many tasks (sending email, checking for actions from a queue, etc) it was designed to run some work, then sleep for 15 minutes to reduce transactions and cost to run.

Out of the box, the WebJob SDK doesn’t support time based triggers, only queue/blob triggers which would have meant a lot more work to re-architect.

After some searching I discovered the NuGet package Microsoft.Azure.WebJobs.Extension which includes a TimerTrigger, exactly what I needed!

It looks something like this:

public static Task RunWorkAsync([TimerTrigger("00:15:00", RunOnStartup =true)] TimerInfo timerInfo)
{
    var worker = new WorkerRole();
    worker.OnStart();
    return worker.RunAsync();
} 

Now every 15 minutes the WebJob will call into my WorkerRole code and everything functions essentially the same as it did when it was a Cloud Service.

Step 3: Test everything works and is pointing to the new subscription

The last step was simple, update connection strings in web.config to point to the new subscription, update CNAME and A Record to point to the new location and smile as everything works!

Conversational UI

I’ve been thinking a lot about simplification lately; how can I get my growing list of tasks done in less time, yet with the same level of accuracy and quality?

When I first heard about the Bot Framework and Conversations as a Platform at the //Build conference earlier this year I was curious – could natural language help me get more done in less time?

Reducing Clicks

Here’s an example task I perform with some frequency during my evenings and weekends managing billing at my Wife’s business:

  1. Receive payment from customer
  2. Search for that customer in our web or mobile interface
  3. Click a button to start entering the transaction
  4. Click ok to persist the transaction
  5. Dismiss the payment alert

With a bot I can instead simply type in:

John Smith paid cash for classes

This is a meaningful time saver and makes me feel like I’ve built something futuristic 🙂

Bot Framework + LUIS

Conceptually, I think of the Bot Framework as managing communication state between different channels – this might be Skype, Slack, Web Chat or any other conversational canvas. The developer creates dialogs that manage the interaction flow.

The problem is that as humans, we don’t always use the exact same words or combination of words to express ourselves, which is where the intent matching needs to be a little fuzzy and tools like LUIS are an excellent complement.

With LUIS, I simply define my intents (I think of these as actions my bot will support). These intents then map directly to methods in my dialog.

Here’s an example, in the LUIS dialog I add an intent:

Then in my Bot I create a method that maps to that intent in my dialog class:

//TODO: Put AppKey and Subscription key from http://luis.ai into this attribute
[LuisModel("", "")]
[Serializable]
public class MyDialog : LuisDialog<object>
{
    [LuisIntent("ReleaseTheHounds")]
    public async Task ReleaseTheHounds(IDialogContext context, LuisResult result)
    {
        //TODO: Release the hounds!
    }
}

Intents by themselves limit your bot to commands with one outcome. When paired with Entities they become more powerful and allow you to pass in variables to these commands to alter the outcome.

Let’s say that I have animals to release other than hounds. In LUIS I could create an Animal entity:

And then train my model by teaching it some entities that are animals:

After entering a few different types of utterances for this intent you’ll end up with something like this:

The dialog can then be modified to release the appropriate type of animal on command:

[LuisIntent("ReleaseTheHounds")]
public async Task ReleaseTheHounds(IDialogContext context, LuisResult result)
{
    EntityRecommendation thingRecommendation;

    if (result.TryFindEntity("Animal", out thingRecommendation))
    {
        switch (thingRecommendation.Entity)
        {
            case "hounds":
            {
                //TODO: Release the hounds!
                break;
            }
            case "cats":
            {
                //TODO: Release the cats!
                break;
            }
            case "giraffes":
            {
                //TODO: Release the giraffes!
                break;
            }
            default:
            {
                break;
            }
       }
    }
}

The last thing that every dialog should have is a catch all method to do something with the commands it didn’t understand. It should look something like this:

[LuisIntent("")]
public async Task None(IDialogContext context, LuisResult result)
{
    string message = $"Sorry I did not understand. I know how to handle the following intents: " + string.Join(", ", result.Intents.Select(i => i.Intent));
    await context.PostAsync(message);
    context.Wait(MessageReceived);
}

That’s pretty much all that’s needed to get a basic bot up and running!

If you’re a C# dev you’ll want the Visual Studio Project Template and the Bot Framework Emulator to start building bots of your own.

On platforms other than Windows, or for Node devs, there’s an SDK for that also.

Debugging Hybrid WebApps in VS2015

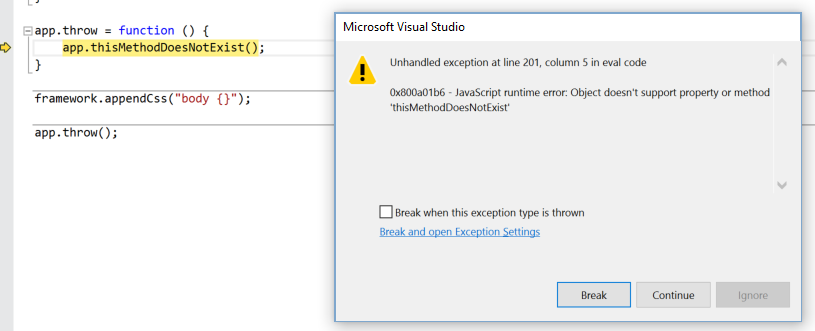
The biggest challenge when working with a C# app that invokes JavaScript functions is that the debugger by default will only attach to the C# code and show an unhandled exception that isn’t very helpful any time something goes wrong in JavaScript:

In Visual Studio 2015, the solution for this is to switch debugging modes so that instead of the debugger monitoring our managed C# code, it’s monitoring our JS context instead.

You can do this by setting the Application process under Debugger type to Script:

Now when you debug the app and run into a JS exception, the debugger will stop and you’ll have full code context:

This includes inspecting the values of variables, stepping into/out of code and doing basically anything you’d normally want to do with the debugger in a JS app.

Kick-O-Meter IoT Project – Software

In the last post, I explained the general idea behind Kick-O-Meter and went into some detail on how to wire up the LED strip with the Arduino.

With the hardware wired up, this post will now focus on the software that makes it work.

Phone App

As this was my first IoT project, I decided to use the Microsoft Maker libraries on GitHub because they are Arduino compatible and I wasn’t sure the level of magic required to communicate. At the time of writing, these libraries aren’t on NuGet and will need to be cloned and built.

Link: https://github.com/ms-iot/remote-wiring

For the Phone app, I created a new Windows 10 project in Visual Studio 2015 then added references to the Microsoft.Maker.Serial library built from the remote-wiring repository above.

Simplified code looks something like this:

using Microsoft.Maker.Serial;
using System;
using Windows.Devices.Sensors;

namespace Kickometer
{
	public class Kickometer
	{
		private BluetoothSerial _Bluetooth;
		private AccelerometerReading _BaseReading;
		private readonly int MASS_CONSTANT = 50;

		public Kickometer()
		{
			_Bluetooth = new BluetoothSerial("Replace-with-actual-BT-device-identifier");
				
			//SerialConfig param apparently doesn't matter for BT, only for USB connection
			_Bluetooth.begin(115200, SerialConfig.SERIAL_8N1);

			var accelerometer = Accelerometer.GetDefault();
			_BaseReading = accelerometer.GetCurrentReading();
			uint minReportInterval = accelerometer.MinimumReportInterval;

			accelerometer.ReportInterval = minReportInterval > 16 ? minReportInterval : 16;
			accelerometer.ReadingChanged += Accelerometer_ReadingChanged;
		}

		private void Accelerometer_ReadingChanged(Accelerometer sender, AccelerometerReadingChangedEventArgs args)
		{
			var xAcceleration = Math.Abs(args.Reading.AccelerationX - _BaseReading.AccelerationX);
			var yAcceleration = Math.Abs(args.Reading.AccelerationY - _BaseReading.AccelerationY);
			var zAcceleration = Math.Abs(args.Reading.AccelerationZ - _BaseReading.AccelerationZ);

			var acceleration = Math.Max(Math.Max(xAcceleration, yAcceleration), zAcceleration);
			var force = MASS_CONSTANT * acceleration;

			_Bluetooth.write((byte)force);

			//reset the base reading so the next calculation uses values relative to the new starting position of the accelerometer
			_BaseReading = args.Reading;
		}
	}
}

The app is watching for changes to the accelerometer, which it then sends via Bluetooth using the Microsoft.Maker.Serial library.

Note: An alternative implementation to the Microsoft.Maker.Serial library would be to use the normal Windows Runtime APIs for Bluetooth

Arduino Sketch

At the Arduino, we’re coding up a single Sketch and making use of the Adafruit NeoPixel library that works with the LED strip.

Get the Adafruit NeoPixel library here: https://github.com/adafruit/Adafruit_NeoPixel

Simplified code looks something like this:

#include <Adafruit_NeoPixel.h>
#define NUM_PIXELS 30 // total number of LED pixels
#define NEOPIXEL_PIN 6 // Digital control pin for NeoPixels

Adafruit_NeoPixel strip = Adafruit_NeoPixel(NUM_PIXELS, NEOPIXEL_PIN, NEO_GRB + NEO_KHZ800);

void setup() 
{
    Serial.begin(115200);
    strip.begin();
    strip.show(); // Initialize all pixels to 'off'
}

void loop() 
{
    if (Serial.available() > 0) 
    {
        int kickVal = Serial.read();
        
        //calculate the uppermost light
        int topLight = ((float)kickVal / (float)100) * (float)NUM_PIXELS;    

        for (int i = 0; i < topLight; i++) {
            strip.setPixelColor(i, strip.Color(0, 255, 0)); //set each pixel to green
            strip.show(); // This sends the updated pixel color to the hardware.
            delay(500); //wait 500ms so they progressively light up
    }     
}

Important: The NEOPIXEL_PIN define must match the pin the wire from the Din on the LED strip is connected to on the Arduino.

That’s pretty much all there is to it – the phone has a communication channel with the Arduino via Bluetooth and the Arduino uses the NeoPixel library to switch on the LEDs according to the force observed by the accelerometer and sent to it.

Finished Product

The finished product was slightly more advanced than shown above, with a simple analytics module that stores the force and time of each kick, analysis of which I’ll cover in a future post.

Here’s a video of it in action:

Kick-O-Meter IoT Project – Hardware

Summers in North America are always a fun, action packed time of year.

For me, the summer officially begins early with a visit to Maker Faire, where I am inspired by the weird and wonderful creativity on display.

For example, this 5-story tall fire-breathing robot:

This year I took inspiration from one of the smaller, (sadly) non fire-breathing IoT projects I noticed and decided to create something interesting for the San Mateo Street Festival – every year in Downtown San Mateo we host a booth for my wife’s Taekwondo business and do our best to stand out from the crowd.

The Idea

Create a digital equivalent to the strongman game often found at carnivals where instead of swinging a sledge hammer at a target near the ground, the objective is to kick a target.

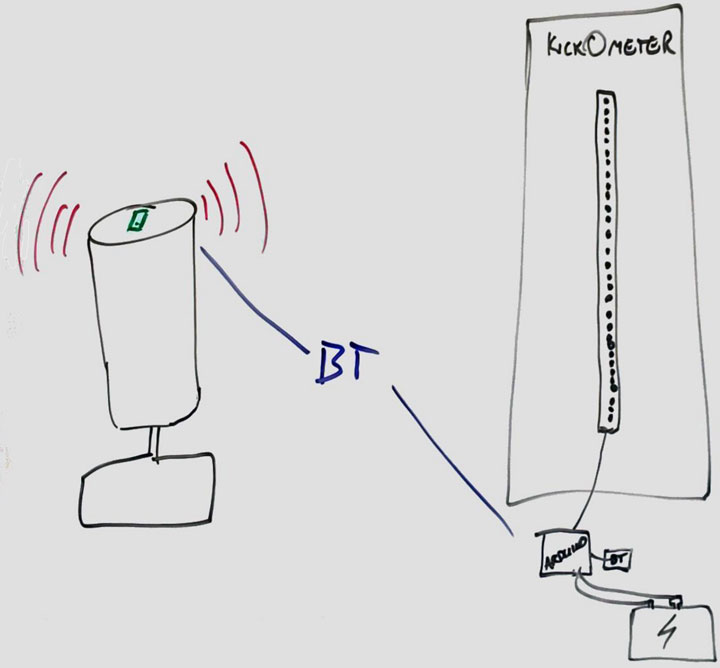
On the whiteboard it looks something like this:

On the left hand side is a Wavemaster (free-standing kicking target commonly found in martial arts facilities) and a phone MacGyvered on top with duct tape.

On the right hand side is an Arduino connected to a Bluetooth module, a digital LED strip and a power source, mounted on a scoreboard.

The logic is fairly simple:

  1. App on phone establishes a Bluetooth connection to the Arduino and monitors its accelerometer
  2. Someone kicks the target, force is calculated and this value is sent to the Arduino via Bluetooth
  3. Arduino receives the value, lights up the appropriate number of LEDs
  4. Person that kicked the target basks in the glory of their score 🙂

Electronics

Below is the list of materials I used for the electronics side of the project.

It needed to be portable and work without mains power all day, so I opted for a beefy USB portable power supply. A Type-M female adapter for power input on the LED strip was a convenient way to support both mains and portable power.

Assembly

Three things need to happen to assemble the hardware correctly for the scoreboard:

  1. Connect the LED strip to power
  2. Connect the LED strip to the Arduino data and ground pins
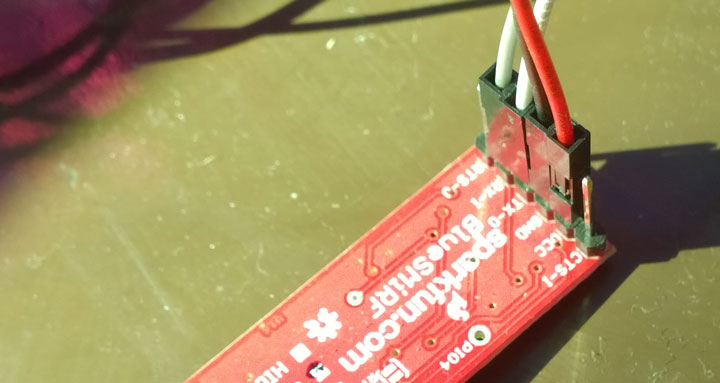
  3. Connect the RX, TX, VCC and GND of the Bluetooth board to the appropriate Arduino pins

Connecting the LED strip to power

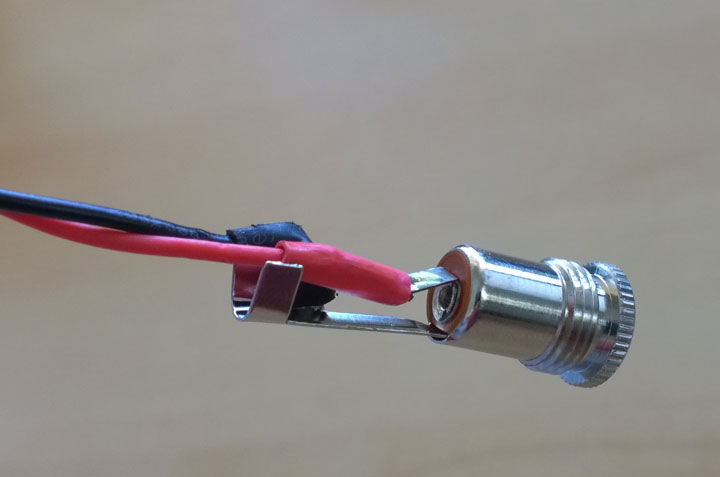
Solder a red wire to the 5V and a black wire to the GND. In parallel across these wires, connect the 1000 uF capacitor before connecting the wires to the Type-M female connector.

I went with a polarity of positive inside the terminal and negative outside the terminal as this was consistent with the DC power supply I was using during testing.

A second wire from the GND needs to be connected to the GND on the Arduino. Cutting a male-to-male jumper cable in half and soldering the wire end to the GND was a simple solution for this.

Connect the LED strip to the Arduino data and ground pins

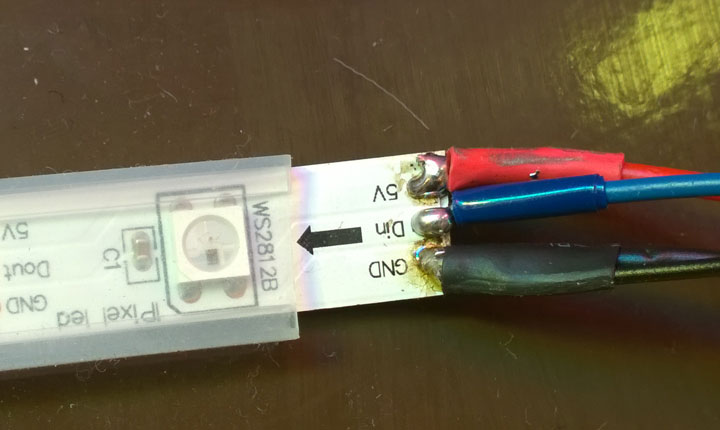
Next, check the direction of the arrows on the LED strip, they need to point away from the Din that the data wire needs to be soldered to.

I chose to solder a blue cable here, which needs to have the 470 Ohm resistor wired inline before connecting to Digital Pin 6 on the Arduino – a different pin can be used if desired, the Sketch will need to be modified to use this other pin in this case.

Connect the Bluetooth board to the Arduino

I found the simplest way to connect wires to the board was to solder in a 6 pin male header then connect female jumpers.

The mapping from the Bluetooth board to the Arduino is as follows:

  • VCC -> 5v on Arduino
  • TX -> RX on Arduino
  • RX -> TX on Arduino
  • GND -> Digital GND on Arduino

That’s pretty much it for the electronics!

In the next post, I’ll discuss the software running on both the phone and the Arduino.

Generating text based avatar images in C#

For one of my projects I needed a way to generate unique avatars for my users, while retaining lots of control over the visual. The avatars will be displayed in a public setting, so I couldn’t risk pulling in inappropriate images from elsewhere.

While there are some existing options such as Gravatar and RoboHash, neither was appropriate for what I needed so I decided to roll my own.

In the spirit of keeping things simple, I noticed the Outlook mail client on mobile generates an avatar image with the first and last initials of the person that sent the email (sorry about the blurry image):

This is ideal for my scenario!

First, to find some complementary background colours for the image.

A visit to one of my favourite sites https://color.adobe.com yielded 5 complementary colour values that I stored in an array:

private List<string> _BackgroundColours = new List<string> { "3C79B2", "FF8F88", "6FB9FF", "C0CC44", "AFB28C" }; }

Then for each user I took their initials:

var avatarString = string.Format("{0}{1}", firstName[0], lastName[0]).ToUpper();

Selected a random background colour from the array:

var randomIndex = new Random().Next(0, _BackgroundColours.Count - 1);
var bgColour = _BackgroundColours[randomIndex];

Then composed them into a bitmap of size 192x192px:

var bmp = new Bitmap(192, 192);
var sf = new StringFormat();
sf.Alignment = StringAlignment.Center;
sf.LineAlignment = StringAlignment.Center;

var font = new Font("Arial", 48, FontStyle.Bold, GraphicsUnit.Pixel);
var graphics = Graphics.FromImage(bmp);

graphics.Clear((Color)new ColorConverter().ConvertFromString("#" + bgColour));
graphics.SmoothingMode = SmoothingMode.AntiAlias;
graphics.TextRenderingHint = TextRenderingHint.ClearTypeGridFit;
graphics.DrawString(avatarString, font, new SolidBrush(Color.WhiteSmoke), new RectangleF(0, 0, 192, 192), sf);
graphics.Flush();

From here it’s just a matter of saving the Bitmap to a stream somewhere, ie:

bmp.Save(stream, ImageFormat.Png)

And I end up with an image of my initials:

I use code similar to what I’ve described here in a service within an ASP.NET MVC5 web role on Azure. It could probably run elsewhere with a few minor changes.

Here’s a Gist with what should be a mostly reusable class (make sure to add a reference to System.Drawing), enjoy!

Babylon.js + HybridWebApp Framework + STL files

Several events aligned recently that rekindled an old flame:

  1. Microsoft HoloLens was announced
  2. I’ve recently gotten into 3d printing
  3. I attended a Hackathon as part of my day job at Microsoft where I met the very talented David Catuhe of Babylon.js fame

This motivated me to get back into the swing of 3d, so I decided to build a small app that loads various 3d printing file formats (starting with STL) into Babylon.js courtesy of my HybridWebApp Framework (no HoloLens…yet).

Step 1

Learn the .babylon file format

This part was easy as the format is well documented and the source code for the loader, easily readable.

I learned that a .babylon file with a single mesh should look similar to this once exported:

{
    "cameras": null,
    "meshes": [
        {
            "name": "myModel",
            "position": [ 0.0, 0.0, 0.0 ],
            "rotation": [ 0.0, 0.0, 0.0 ],
            "scaling": [ 1.0, 1.0, 1.0 ],
            "infiniteDistance": false,
            "isVisible": true,
            "isEnabled": true,
            "pickable": false,
            "applyFog": false,
            "alphaIndex": 0,
            "billboardMode": 0,
            "receiveShadows": false,
            "checkCollisions": false,
            "positions": [],
            "normals": [],
            "uvs": null,
            "indices": []
        }
    ] 
}

So I created some simple C# models to represent the mesh/file structure:

public class BabylonMesh
{
    public string Name { get; set; }
    public float[] Position { get; set; }
    public float[] Rotation { get; set; }
    public float[] Scaling { get; set; }
    public bool InfiniteDistance { get; set; }
    public bool IsVisible { get; set; }
    public bool IsEnabled { get; set; }
    public bool Pickable { get; set; }
    public bool ApplyFog { get; set; }
    public int AlphaIndex { get; set; }
    public BillboardMode BillboardMode { get; set; }
    public bool ReceiveShadows { get; set; }
    public bool CheckCollisions { get; set; }
    public float[] Positions { get; set; }
    public float[] Normals { get; set; }
    public float[] Uvs { get; set; }
    public int[] Indices { get; set; }
}
public class BabylonFile
{
    public IEnumerable<BabylonCamera> Cameras { get; set; }
    public IEnumerable<BabylonMesh> Meshes { get; set; }
}

Step 2

Learn about the STL file format

As it turns out, STL (or STereoLithography) is a really old format published by 3D Systems in the late 80’s that has both a binary representation and an ASCII representation. Wikipedia gave a pretty good outline, however I preferred the reference on fabbers spec page.

I decided to implement both ASCII and binary as I noticed Sketchfab and other sites had both derivatives for download.

In essence, STL is a simple format that stores normals and facets (aka vertices)…and that’s it. No materials or colour data, just triangles. This made it fairly simple to convert, although I needed to brush up on my knowledge of vertex and index buffers – the Rendering from Vertex and Index Buffers article on MSDN was a great reference.

Step 3

Get Babylon.js running in a WebView

There were a few different ways to approach this and I decided rather than hosting the html on Azure and thus creating an internet dependency on the app, I would simply host the HTML within the app package and inject the mesh into the scene when it was converted.

As it turns out, there was a bug in my HybridWebApp Framework that broke loading of local HTML, so after a slight detour fixing that bug I was back on track.

The various components of the app ended up looking like this:

MainPage.xaml

<Page
    x:Class="BabylonJs.WebView.MainPage"
    xmlns="http://schemas.microsoft.com/winfx/2006/xaml/presentation"
    xmlns:x="http://schemas.microsoft.com/winfx/2006/xaml"
    xmlns:local="using:BabylonJs.WebView"
    xmlns:toolkit="using:HybridWebApp.Toolkit.Controls"
    xmlns:d="http://schemas.microsoft.com/expression/blend/2008"
    xmlns:mc="http://schemas.openxmlformats.org/markup-compatibility/2006"
    mc:Ignorable="d">

    <Grid Background="{ThemeResource ApplicationPageBackgroundThemeBrush}">
        <ProgressBar Margin="0,10,0,0"  
                     IsIndeterminate="True" 
                     Loaded="ProgressBar_Loaded" 
                     Visibility="Collapsed" 
                     VerticalAlignment="Top" 
                     HorizontalAlignment="Stretch" />
        <toolkit:HybridWebView x:Name="WebHost" Margin="0,20,0,0" WebUri="ms-appx-web:///www/app.html" Ready="WebHost_Ready" MessageReceived="WebHost_MessageReceived" EnableLoadingOverlay="False" NavigateOnLoad="False" />
    </Grid>
    <Page.BottomAppBar>
        <CommandBar x:Name="CommandBar">
            <CommandBar.PrimaryCommands>
                <AppBarButton Icon="OpenFile" Click="ImportStlFile_Click" Label="Import" />
                <AppBarButton x:Name="SaveButton" IsEnabled="False" Icon="Save" Click="SaveConverted_Click" Label="Save" />
            </CommandBar.PrimaryCommands>
        </CommandBar>
    </Page.BottomAppBar>
</Page>

app.html

<!DOCTYPE html>

<html lang="en" xmlns="http://www.w3.org/1999/xhtml">
<head>
    <meta charset="utf-8" />
    <style>
        html, body {
            overflow: hidden;
            width: 100%;
            height: 100%;
            margin: 0;
            padding: 0;
        }

        canvas {
            width: 100%;
            height: 100%;
            touch-action: none;
        }
    </style>
    <script src="ms-appx-web:///www/js/cannon.js"></script>
    <script src="ms-appx-web:///www/js/Oimo.js"></script>
    <script src="ms-appx-web:///www/js/babylon.2.0.js"></script>
    <script src="ms-appx-web:///www/js/app.js"></script>
</head>
<body>
    <canvas id="canvas"></canvas>
</body>
</html>

app.js

/// <reference path="babylon.2.0.debug.js" />
app = {};

app._engine = null;
app._scene = null;
app._canvas = null;

app._transientContents = [];

app.initScene = function (canvasId) {
    var canvas = document.getElementById(canvasId);
    
    var engine = new BABYLON.Engine(canvas, true);
    var scene = new BABYLON.Scene(engine);

    var dirLight = new BABYLON.DirectionalLight('dirLight', new BABYLON.Vector3(0,1,0), scene);
    dirLight.diffuse = new BABYLON.Color3(0.1, 0.2, 0.3);

    var arcRotateCamera = new BABYLON.ArcRotateCamera("arcCamera", 1, 0.8, 10, BABYLON.Vector3.Zero(), scene);
    arcRotateCamera.target = new BABYLON.Vector3(0, 10, 0);

    scene.activeCamera = arcRotateCamera;
    scene.activeCamera.attachControl(canvas, true);

    var debugLayer = new BABYLON.DebugLayer(scene);
    debugLayer.show(true);

    this._canvas = canvas;
    this._engine = engine;
    this._scene = scene;

    engine.runRenderLoop(function () {
        arcRotateCamera.alpha += 0.001;

        scene.render();
    });
}

C# code to init Babylon.js (in MainPage.xaml.cs)

private void WebHost_Ready(object sender, EventArgs e)
{
    WebHost.WebRoute.Map("/", async (uri, success, errorCode) =>
    {
        if (success)
        {
            await WebHost.Interpreter.EvalAsync("app.initScene('canvas');");
        }
    }
}

As it turns out, Babylon.js (and thus WebGL) works like any other webpage when hosted inside the WebView. No magic required.

Step 4

Glue it all together!

Now that I had the pieces in place, it was a simple matter of writing some JavaScript for scene management (clear the old mesh, load the new mesh, position the camera) and proxying the converted .babylon file into the WebView to be rendered by Babylon.js.

The StlConverter is fairly simple to use, taking a Stream as the constructor parameter with a single ToJsonAsync method that performs the conversion:

var s = await file.OpenReadAsync();
var converter = new StlConverter(s.AsStream());
var result = await converter.ToJsonAsync();

Sending the result of this from the host app to the website is simple also:

await WebHost.Interpreter.EvalAsync(string.Format("app.loadBabylonModel('{0}');", result));

The called function looks like this and does the actual loading of the mesh:

app.loadBabylonModel = function (json) {

    var dataUri = "data:" + json;
    var scene = this._scene;
    var canvas = this._canvas;
    var transientContents = this._transientContents;

    BABYLON.SceneLoader.ImportMesh("", "/", dataUri, scene, function (meshArray) {
        meshArray[0].position = new BABYLON.Vector3(0, 0, 0);
        meshArray[0].rotation = new BABYLON.Vector3(0, 0, 0);
        meshArray[0].scaling = new BABYLON.Vector3(1, 1, 1);
        
        scene.activeCamera.setPosition(new BABYLON.Vector3(0, meshArray[0].getBoundingInfo().boundingBox.center.y, meshArray[0].getBoundingInfo().boundingSphere.radius * 4));
        scene.activeCamera.target = new BABYLON.Vector3(0, meshArray[0].getBoundingInfo().boundingBox.center.y, 0);

        //put standard material onto the mesh
        var material = new BABYLON.StandardMaterial("", scene);
        material.emissiveColor = new BABYLON.Color3(105 / 255, 113 / 255, 121 / 255);
        material.specularColor = new BABYLON.Color3(1.0, 0.2, 0.7);
        material.backFaceCulling = false;
        meshArray[0].material = material;
        
        framework.scriptNotify(JSON.stringify({ type: 'log', payload: 'mesh imported, array length was ' + meshArray.length }));

        transientContents.push(meshArray[0]);
    });
}

Voila, we now have a loaded mesh in the scene:

While at the time of writing there are some issues with the normals that are causing inconsistent lighting, I’m otherwise quite happy with how this little project has panned out. I plan to support additional file formats in future also (AMF, OBJ) and make better use of web -> host app communication.

The full source code to accompany the article is available on Github: https://github.com/craigomatic/BabylonJS-Framework