Recently, I had a need to build an Outlook Add-in that connected to Dynamics 365 CE (previously known as CRM) so that the user could associate emails and calendar items with records in Dynamics 365.
While there is an OOB Dynamics 365 Add-in for Outlook, it did not deliver the experience we needed for our scenario, so there was no better excuse to roll up the sleeves and write some code. Here are some things I learned 🙂
Authentication
The simplest way to secure just about any resource for users of Office 365 is via Azure Active Directory and step one is to create an Azure AD app within the Azure portal.
But not so fast!
There are two different flavours of Azure AD, v1 and v2 and two different ways to handle authentication in an Office Add-in: SSO which inherits the logged in user from Outlook, or the Dialog API where the user is prompted for credentials.
It seemed obvious at first glance that I would use SSO – why would I hassle the user to enter credentials again when I can just use the token they already have?
Unfortunately there are 2 problems with this:
- SSO requires Azure AD v2, which does not currently allow scopes to 3rd party APIs that aren’t on Microsoft Graph, such as Dynamics 365
- The Identity APIs, which are responsible for SSO are only available on desktop Outlook for users in the Office Insider Preview fast ring, so if you have users that have not opted in to this program, authentication will fail
For my scenario, this left using the Dialog API and AAD v1 as the only option.
In Azure AD, make sure to give your app permissions to Dynamics 365:
Next, if you’ve done any ASP.NET development you’re probably familiar with the Authorize attribute. It looks like this:
[Authorize]
Simply place it at the top of any controller or action you want to protect, configure the middleware appropriately and the framework takes care of the rest.
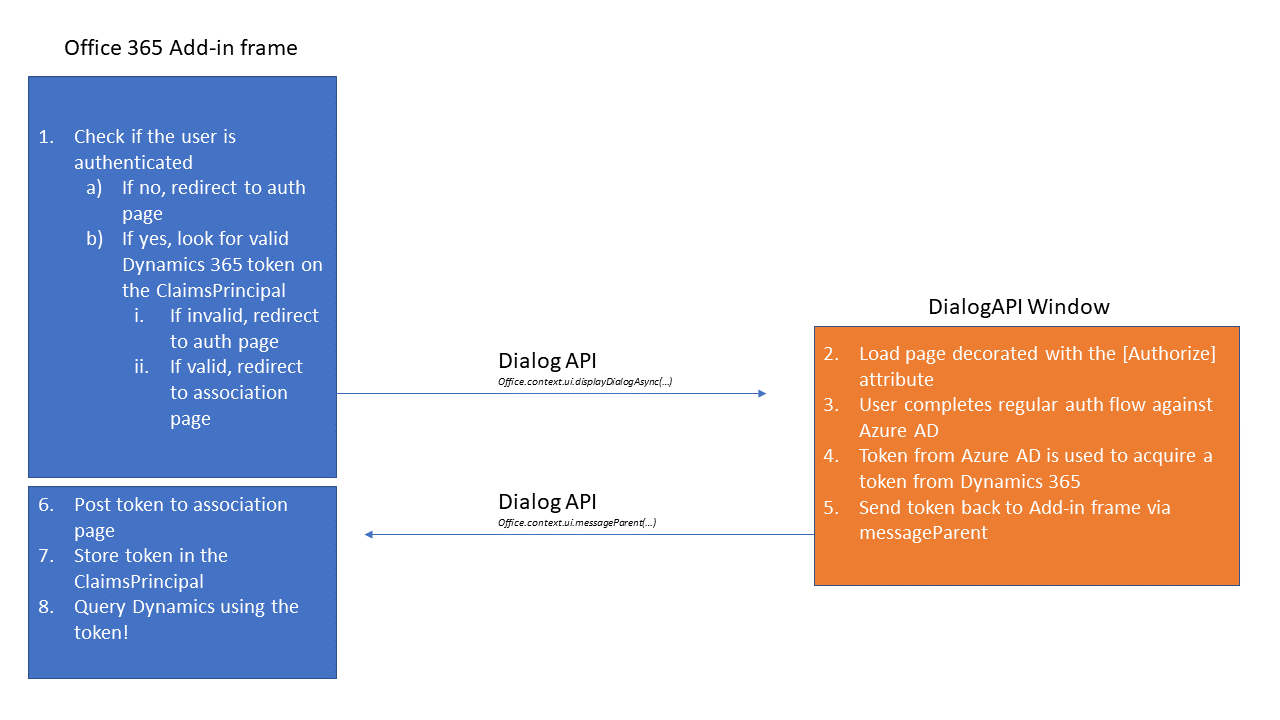
Alas! Azure AD will not allow a token to be acquired in a frame due to X-Frame-Options set to Deny, so the auth flow needs to occur in a new window.
This now causes a problem, as any updates to the UserPrincipal after successful authentication disappear when the window is closed and control returns to the parent frame – it’s a separate session.
To overcome this, I ended up posting back the token from the window via the Dialog API’s messageParent function, that I then use to acquire a token for my instance of Dynamics 365.
The end result is something that follows this sequence:

I also ended up writing some extensions that may be useful if you need to so something similar, find them at https://github.com/craigomatic/dynamics365-identity-extensions
DevOps
While an Office 365 Add-in is just a website and the usual deployment techniques work exactly as you’d expect, the add-ins are also required to include a manifest file that tells Office a bunch of things such as:
- Where the add-in can be displayed (ie: Outlook, Word, Excel, etc)
- The circumstances under which it should be displayed/activated.
- The URI to the add-in
Something useful I found during development was to create several manifests, one for each of:
- Dev on my local machine (localhost)
- Test slot on Azure App Service for my beta testers
- Production slot on Azure App Service for regular users
I would then sideload the dev, test and prod manifests, each with slightly different icons to my Office 365 tenant so that I could validate functionality as I worked.
Read up on the manifest format over at the Office Dev Center