Using ASP.NET Core to build an Outlook Add-in for Dynamics 365

Recently, I had a need to build an Outlook Add-in that connected to Dynamics 365 CE (previously known as CRM) so that the user could associate emails and calendar items with records in Dynamics 365.

While there is an OOB Dynamics 365 Add-in for Outlook, it did not deliver the experience we needed for our scenario, so there was no better excuse to roll up the sleeves and write some code. Here are some things I learned 🙂

Authentication

The simplest way to secure just about any resource for users of Office 365 is via Azure Active Directory and step one is to create an Azure AD app within the Azure portal.

But not so fast!

There are two different flavours of Azure AD, v1 and v2 and two different ways to handle authentication in an Office Add-in: SSO which inherits the logged in user from Outlook, or the Dialog API where the user is prompted for credentials.

It seemed obvious at first glance that I would use SSO – why would I hassle the user to enter credentials again when I can just use the token they already have?

Unfortunately there are 2 problems with this:

  1. SSO requires Azure AD v2, which does not currently allow scopes to 3rd party APIs that aren’t on Microsoft Graph, such as Dynamics 365
  2. The Identity APIs, which are responsible for SSO are only available on desktop Outlook for users in the Office Insider Preview fast ring, so if you have users that have not opted in to this program, authentication will fail

For my scenario, this left using the Dialog API and AAD v1 as the only option.

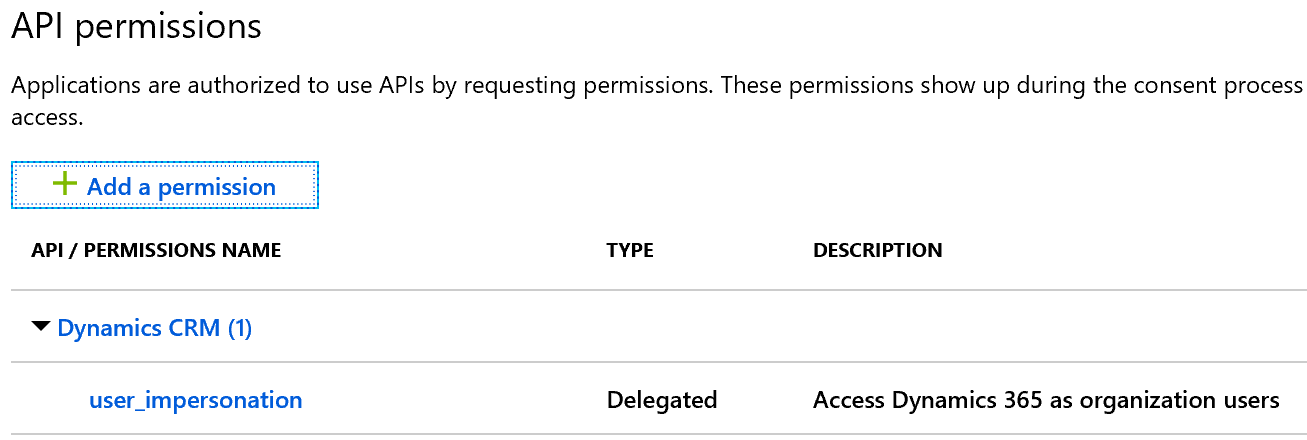
In Azure AD, make sure to give your app permissions to Dynamics 365:

Next, if you’ve done any ASP.NET development you’re probably familiar with the Authorize attribute. It looks like this:

[Authorize]

Simply place it at the top of any controller or action you want to protect, configure the middleware appropriately and the framework takes care of the rest.

Alas! Azure AD will not allow a token to be acquired in a frame due to X-Frame-Options set to Deny, so the auth flow needs to occur in a new window.

This now causes a problem, as any updates to the UserPrincipal after successful authentication disappear when the window is closed and control returns to the parent frame – it’s a separate session.

To overcome this, I ended up posting back the token from the window via the Dialog API’s messageParent function, that I then use to acquire a token for my instance of Dynamics 365.

The end result is something that follows this sequence:

I also ended up writing some extensions that may be useful if you need to so something similar, find them at https://github.com/craigomatic/dynamics365-identity-extensions

DevOps

While an Office 365 Add-in is just a website and the usual deployment techniques work exactly as you’d expect, the add-ins are also required to include a manifest file that tells Office a bunch of things such as:

  • Where the add-in can be displayed (ie: Outlook, Word, Excel, etc)
  • The circumstances under which it should be displayed/activated.
  • The URI to the add-in

Something useful I found during development was to create several manifests, one for each of:

  • Dev on my local machine (localhost)
  • Test slot on Azure App Service for my beta testers
  • Production slot on Azure App Service for regular users

I would then sideload the dev, test and prod manifests, each with slightly different icons to my Office 365 tenant so that I could validate functionality as I worked.

Read up on the manifest format over at the Office Dev Center

Conversational UI

I’ve been thinking a lot about simplification lately; how can I get my growing list of tasks done in less time, yet with the same level of accuracy and quality?

When I first heard about the Bot Framework and Conversations as a Platform at the //Build conference earlier this year I was curious – could natural language help me get more done in less time?

Reducing Clicks

Here’s an example task I perform with some frequency during my evenings and weekends managing billing at my Wife’s business:

  1. Receive payment from customer
  2. Search for that customer in our web or mobile interface
  3. Click a button to start entering the transaction
  4. Click ok to persist the transaction
  5. Dismiss the payment alert

With a bot I can instead simply type in:

John Smith paid cash for classes

This is a meaningful time saver and makes me feel like I’ve built something futuristic 🙂

Bot Framework + LUIS

Conceptually, I think of the Bot Framework as managing communication state between different channels – this might be Skype, Slack, Web Chat or any other conversational canvas. The developer creates dialogs that manage the interaction flow.

The problem is that as humans, we don’t always use the exact same words or combination of words to express ourselves, which is where the intent matching needs to be a little fuzzy and tools like LUIS are an excellent complement.

With LUIS, I simply define my intents (I think of these as actions my bot will support). These intents then map directly to methods in my dialog.

Here’s an example, in the LUIS dialog I add an intent:

Then in my Bot I create a method that maps to that intent in my dialog class:

//TODO: Put AppKey and Subscription key from http://luis.ai into this attribute
[LuisModel("", "")]
[Serializable]
public class MyDialog : LuisDialog<object>
{
    [LuisIntent("ReleaseTheHounds")]
    public async Task ReleaseTheHounds(IDialogContext context, LuisResult result)
    {
        //TODO: Release the hounds!
    }
}

Intents by themselves limit your bot to commands with one outcome. When paired with Entities they become more powerful and allow you to pass in variables to these commands to alter the outcome.

Let’s say that I have animals to release other than hounds. In LUIS I could create an Animal entity:

And then train my model by teaching it some entities that are animals:

After entering a few different types of utterances for this intent you’ll end up with something like this:

The dialog can then be modified to release the appropriate type of animal on command:

[LuisIntent("ReleaseTheHounds")]
public async Task ReleaseTheHounds(IDialogContext context, LuisResult result)
{
    EntityRecommendation thingRecommendation;

    if (result.TryFindEntity("Animal", out thingRecommendation))
    {
        switch (thingRecommendation.Entity)
        {
            case "hounds":
            {
                //TODO: Release the hounds!
                break;
            }
            case "cats":
            {
                //TODO: Release the cats!
                break;
            }
            case "giraffes":
            {
                //TODO: Release the giraffes!
                break;
            }
            default:
            {
                break;
            }
       }
    }
}

The last thing that every dialog should have is a catch all method to do something with the commands it didn’t understand. It should look something like this:

[LuisIntent("")]
public async Task None(IDialogContext context, LuisResult result)
{
    string message = $"Sorry I did not understand. I know how to handle the following intents: " + string.Join(", ", result.Intents.Select(i => i.Intent));
    await context.PostAsync(message);
    context.Wait(MessageReceived);
}

That’s pretty much all that’s needed to get a basic bot up and running!

If you’re a C# dev you’ll want the Visual Studio Project Template and the Bot Framework Emulator to start building bots of your own.

On platforms other than Windows, or for Node devs, there’s an SDK for that also.

Debugging Hybrid WebApps in VS2015

The biggest challenge when working with a C# app that invokes JavaScript functions is that the debugger by default will only attach to the C# code and show an unhandled exception that isn’t very helpful any time something goes wrong in JavaScript:

In Visual Studio 2015, the solution for this is to switch debugging modes so that instead of the debugger monitoring our managed C# code, it’s monitoring our JS context instead.

You can do this by setting the Application process under Debugger type to Script:

Now when you debug the app and run into a JS exception, the debugger will stop and you’ll have full code context:

This includes inspecting the values of variables, stepping into/out of code and doing basically anything you’d normally want to do with the debugger in a JS app.

Generating text based avatar images in C#

For one of my projects I needed a way to generate unique avatars for my users, while retaining lots of control over the visual. The avatars will be displayed in a public setting, so I couldn’t risk pulling in inappropriate images from elsewhere.

While there are some existing options such as Gravatar and RoboHash, neither was appropriate for what I needed so I decided to roll my own.

In the spirit of keeping things simple, I noticed the Outlook mail client on mobile generates an avatar image with the first and last initials of the person that sent the email (sorry about the blurry image):

This is ideal for my scenario!

First, to find some complementary background colours for the image.

A visit to one of my favourite sites https://color.adobe.com yielded 5 complementary colour values that I stored in an array:

private List<string> _BackgroundColours = new List<string> { "3C79B2", "FF8F88", "6FB9FF", "C0CC44", "AFB28C" }; }

Then for each user I took their initials:

var avatarString = string.Format("{0}{1}", firstName[0], lastName[0]).ToUpper();

Selected a random background colour from the array:

var randomIndex = new Random().Next(0, _BackgroundColours.Count - 1);
var bgColour = _BackgroundColours[randomIndex];

Then composed them into a bitmap of size 192x192px:

var bmp = new Bitmap(192, 192);
var sf = new StringFormat();
sf.Alignment = StringAlignment.Center;
sf.LineAlignment = StringAlignment.Center;

var font = new Font("Arial", 48, FontStyle.Bold, GraphicsUnit.Pixel);
var graphics = Graphics.FromImage(bmp);

graphics.Clear((Color)new ColorConverter().ConvertFromString("#" + bgColour));
graphics.SmoothingMode = SmoothingMode.AntiAlias;
graphics.TextRenderingHint = TextRenderingHint.ClearTypeGridFit;
graphics.DrawString(avatarString, font, new SolidBrush(Color.WhiteSmoke), new RectangleF(0, 0, 192, 192), sf);
graphics.Flush();

From here it’s just a matter of saving the Bitmap to a stream somewhere, ie:

bmp.Save(stream, ImageFormat.Png)

And I end up with an image of my initials:

I use code similar to what I’ve described here in a service within an ASP.NET MVC5 web role on Azure. It could probably run elsewhere with a few minor changes.

Here’s a Gist with what should be a mostly reusable class (make sure to add a reference to System.Drawing), enjoy!

Crafting Hybrid WebApps

A good Hybrid WebApp is one that feels more app than website and most importantly, presents a compelling reason to use the app instead of opening the website in a browser.

Lets avoid creating websites in a box, ok?

In order to become masters of our craft and create a great experience for our end users, we’ll need a solid understanding of the website the app will be based on.

As we don’t always have access to server-side code or an ability to customise the delivery of the website to better suit our app, this typically results in a trip to the DOM Inspector and Javascript console to:

  1. Decide which elements don’t make sense in our app. These typically include footers, links to download apps (we’re already in an app!), navigation items, etc
  2. Decide which features of a native app, such as secondary tile pinning, background audio, etc make sense to support
  3. Look for nice JavaScript objects that we can reuse as data sources for our app (ie: model objects)
  4. Look for nice JavaScript functions that we can call to perform tasks such as authentication

The way I typically do this is a combination of the IE dev tools:

And Visual Studio DOM Explorer:

For Windows Phone I tend to use the Visual Studio DOM explorer more as it loads the site in the emulator, if you weren’t aware you can debug a website in any of the Windows Phone emulators via:

Once we have an idea of our integration, start mocking it up live in the tools mentioned above (IE Dev tools, DOM Explorer).

In practice my environment looks something like this when I’m starting to work on a new Hybrid WebApp (although usually across multiple screens):

Then as I work out a new style change, I copy it over to app.css. Likewise for scripts, which end up in app.js.

HybridWebApp Framework

After some work I did last year took me deep into the realm of merging website + app, I decided to take some of those learnings and build a reusable framework and imaginatively named it the HybridWebApp Framework.

Below is a little history on the problems the framework overcomes and some links so you can start building great Hybrid WebApps today 🙂

The problem

Most WebApps I saw being developed were little more than a website in a box – my challenge was to go beyond this in a significant way and create an app based on a website that really felt like an app as opposed to the typical 1 part WebView, 1 part CSS approach.

If we consider the interaction model between website and app in the most basic website in a box implementation, it looks something like this:

Unsurprisingly, this rarely results in a good end user experience as it is simply a recreation of the website with some minor tweaks, housed in a basic app. There is very little ability to interact with OS light up features under this model and even the most basic of tasks such as pinning secondary tiles is challenging.

This begs the question: Why would an end user want to use this type of app instead of the website when they offer largely the same experience?

The solution

From the above we can deduce that the website needs to be able to communicate easily back to the host app so that the host app can take advantage of the content!

This is already possible through the use of ScriptNotify, however there is one important caveat in Windows 8.1: the website and all of it’s content must be hosted over HTTPS, which isn’t always the case.

This is where the HybridWebApp Framework comes into play, creating a structured way for the website and the host to communicate bi-directionally, so our interaction model looks more like this:

In practice this means developers can write some JavaScript, executed on demand, that sends some data back to the host app.

With this in mind, lets imagine a recipe website as a hybrid app where we want to implement a secondary tile feature that pins the current recipe to the start screen of the device.

The implementation:

  1. The user taps the Pin icon in the app which invokes a JavaScript function app.pinRecipe()
  2. The app.pinRecipe() function reads the DOM, finds the title of the current recipe, the URI to the image and some other info that should be displayed on the tile
  3. The function then uses framework.scriptNotify to send a JSON object that contains this info to the host app which then converts the JSON into a C# model instance
  4. The host app takes that C# model and generates a secondary tile as usual.

Voila! Dynamically generated live tile is now on the start screen and user is happy.

Usage

The simplest way to use the HybridWebApp Framework and/or the Toolkit (Toolkit approach is strongly recommended) is to grab them from NuGet:

HybridWebApp.Framework

HybridWebApp.Toolkit (Recommended)

You can also reference the source directly, clone from the GitHub project located here: https://github.com/craigomatic/HybridWebApp-Framework

Rather than regurgitating what is already posted on the Wiki, please see https://github.com/craigomatic/HybridWebApp-Framework/wiki/HybridWebView-Control to get started building great Hybrid WebApps 🙂